
June 28, 2020 ( last updated : June 27, 2020 )
cors
storage
this
Curring
web worker
Message Queue and Event Loop
PWA
함수 호이스팅
스코프
화살표 함수
스코프체인
클로저
call/bind/apply
prototype
https://github.com/gmm117/gmm117.github.io
    cors
    storage
    this
    커링 함수 (Curring function)
    web worker
    Time, Message Queue and Event Loop
    PWA
    함수 호이스팅(Function hoisting)
    스코프
    화살표 함수없는 것 3가지
    스코프체인
    클로저,
    call/bind/apply
    prototype
서버와의 통신을 위해 ajax나 XMLHttpRequest를 사용하다보면 CORS 에러가 나오는 경우가 종종 발생합니다. 할때마다 설정 방법이나 우회 방법을 항상 찾다보니 매번 고생하는거 같아 정리해봅니다.
CORS 란? CORS는 Cross-Origin Resource Sharing의 약자로 보안상의 이유로, 브라우저들은 스크립트 내에서 초기화되는 cross-origin HTTP 요청을 제한합니다. 예를 들면 다음과 같습니다.
위 예제에서 사이트의 도메인은 www.a.com인데 Ajax를 할 경우 www.b.com처럼 다른 도메인에 보낼 경우 CORS 관련 에러가 납니다. 아래는 Same-origin(프로토콜, 호스트명, 포트)이 되는 조건에 대해서 보여줍니다.
app.get('/data', (req, res) => {
    res.header("Access-Control-Allow-Origin", "*");
    res.send(data);
});
간단하게 모든 클라이언트에 요청에 대한 cross-origin HTTP 요청을 허가하는 헤더를 추가해 주었습니다.
그치만 rest.api의 모든 응답에 일일히 추가해주기 힘들겠죠?
이미 만들어진 node.js 미들웨어중 이를 해결해주는 미들웨어가 있는데 바로 CORS 입니다.
npm install --save cors

yarn add cors
//이것을 이용하면 더욱 간단하게 CORS를 허가해줄 수 있습니다

const express = require('express');
const cors = require('cors');

const app = express();

app.use(cors()); // CORS 미들웨어 추가
하지만 위에 처럼 헤더를 추가 하거나 미들웨어를 적용하면 모든 요청에 대해 허가를 하게 됩니다. 보안적으로 취약해질 수 있겠죠?
그래서 cors 미들웨어에는 여러가지 설정할 수 있습니다.
const corsOptions = {
    origin: 'http://localhost:3000', // 허락하고자 하는 요청 주소
    credentials: true, // true로 하면 설정한 내용을 response 헤더에 추가 해줍니다.
};
app.use(cors(corsOptions)); // config 추가
https://velog.io/@wlsdud2194/cors https://velog.io/@jmkim87/%EC%A7%80%EA%B8%8B%EC%A7%80%EA%B8%8B%ED%95%9C-CORS-%ED%8C%8C%ED%97%A4%EC%B3%90%EB%B3%B4%EC%9E%90
// 직접 서버간의 통신으로는 cors error가 발생하지 않는다(브라우저 정책상 제한:domain,port,protocol)
// XMLHttpRequest get request
app.get('/serverTest', (req, res) => {
    var XMLHttpRequest = require("xmlhttprequest").XMLHttpRequest;
    var xmlHttp = new XMLHttpRequest();
    xmlHttp.onreadystatechange = function() {
        if (this.status == 200 && this.readyState == this.DONE) {
        console.log(xmlHttp.responseText);
        }
    }

    xmlHttp.open("GET", "http://localhost:3000/corsTest?" + "id=gmm117&pw=hongseungah");

    xmlHttp.send();
    res.send('cors server success');
});

// XMLHttpRequest post request
app.get('/serverpostTest', (req, res) => {
    var XMLHttpRequest = require("xmlhttprequest").XMLHttpRequest;
    var xhr = new XMLHttpRequest();
    xhr.onreadystatechange = function() {
        if (this.status == 200 && this.readyState == this.DONE) {
        console.log(xhr.responseText);
        }
    }

    xhr.open("POST", "http://localhost:3000/corspostTest", false);
    // xhr.setRequestHeader("Content-type", "application/json");
    // const data = JSON.stringify({
    //     id: 'gmm117',
    //     pw: 'hongseungah'
    // });
    xhr.setRequestHeader("Content-Type", "application/x-www-form-urlencoded");
    xhr.send("id=gmm117&pw=hongseungah");
    res.send("cors client test");
});

// ajax post request
app.get('/serverpostajaxTest', (req, res) => {
    $.ajax({
        url:'http://localhost:3000/corspostTest', // 요청 할 주소
        async:false,// false 일 경우 동기 요청으로 변경
        type:'POST', // GET, PUT
        data: "id=gmm117&pw=hongseungah",// 전송할 데이터
        dataType:'text',// xml, json, script, html
        beforeSend:function(jqXHR) {},// 서버 요청 전 호출 되는 함수 return false; 일 경우 요청 중단
        success:function(jqXHR) {},// 요청 완료 시
        error:function(jqXHR) {},// 요청 실패.
        complete:function(jqXHR) {}// 요청의 실패, 성공과 상관 없이 완료 될 경우 호출
    });

    res.send("cors ajax client test");
});


// axios post request
app.get('/serverpostaxiosTest', (req, res) => {
    axios({
        url: 'http://localhost:3000/corspostTest',
        method: 'POST',
        data: "id=gmm117&pw=hongseungah"
      });

    res.send("cors axios client test");
});

// fetch post request
app.get('/serverpostfetchTest', (req, res) => {
    fetch('http://localhost:3000/corspostTest', {
        method: 'POST',
        body: JSON.stringify({
                id: 'gmm117',
                pw: 'hongseungah'
            }),
        headers: {'Content-Type': 'application/json'}
    })
    .then(response => console.log(response));

    res.send("cors fetch client test");
});

var port = 5000;
app.listen(port, () => {
    console.log('server on! http://localhost:', port);
});

// server
var express = require('express');
var bodyParser = require('body-parser');
var app = express();

app.get('/', (req, res) => {
    res.send('hello world');
});

app.get('/corsTest', (req, res) => {
    res.header("Access-Control-Allow-Origin", "http://localhost:5000");

    res.send('cors success');
    console.log(req.query.id , req.query.pw);
});

app.use(bodyParser.urlencoded({extended: true}));
app.use(bodyParser.json());

app.post('/corspostTest', (req, res) => {
    res.header("Access-Control-Allow-Origin", "http://localhost:5000");
    res.send('cors post success');
    console.log(req.body);
});

var port = 3000;
app.listen(port, () => {
    console.log('server on! http://localhost:', port);
});https://github.com/gmm117/cors
    document.cookie = "Hong's";
    document.cookie = "user_age=38";

    // 읽기
    console.log(document.cookie);

    // 변경
    document.cookie = "user_age=37";


    // 삭제
    document.cookie = "user_age=37;expires=Thu, 01 Jan 2000 00:00:01 GMT";

console.log(document.cookie); // 생성
const user = { name: "Hong's", age: 36 }
localStorage.setItem('user', JSON.stringify(user));
// 읽기 (단일)
const readUser = localStorage.getItem('user');
if (typeof readUser === 'string') {
console.log( JSON.parse(readUser));
}
// 변경
const updatedUser = { name: "Hong's", age: 37 }
localStorage.setItem('user', JSON.stringify(updatedUser));
// 삭제
localStorage.removeItem('user'); // 생성
const user = { name: "Hong's", age: 36 }
sessionStorage.setItem('user', JSON.stringify(user));
// 읽기 (단일)
const readUser = sessionStorage.getItem('user');
if (typeof readUser === 'string') {
console.log( JSON.parse(readUser));
}
// 변경
const updatedUser = { name: "Hong's", age: 37 }
sessionStorage.setItem('user', JSON.stringify(updatedUser));
// 삭제
sessionStorage.removeItem('user');https://dongwoo.blog/2016/12/19/%ED%81%B4%EB%9D%BC%EC%9D%B4%EC%96%B8%ED%8A%B8-%EC%B8%A1%EC%9D%98-%EC%A0%80%EC%9E%A5%EC%86%8C-%EC%82%B4%ED%8E%B4%EB%B3%B4%EA%B8%B0/ https://tristan91.tistory.com/521
const someone = {
 name: 'hong',
 consoleName: function() {
    console.log(this);
 }
};

// someone에 의해서 결정된다.
someone.consoleName();

const someonewindow = someone.consoleName;
// 내부적으로 someonewindow() 함수를 window가 호출됨으로 this는 window를 가리킨다.
someonewindow();

// html button dom에서 수행했으므로 this는 button이 된다.
// 동일하게 this는 button이 된다.
const btn = document.getElementById('btn');
btn.addEventListener('click', someone.consoleName);
btn.addEventListener('click', someone.someonewindow);var plus = function(a, b, c) {
return a + b + c;
};
Function.prototype.partial = function() {
var args = [].slice.apply(arguments);
var self = this;
return function() {
return self.apply(null, args.concat([].slice.apply(arguments)));
};
};
var plusa = plus.partial(1);
plusa(2, 3); // 6
var plusb = plusa.partial(2);
plusb(4); // 7
var plusab = plus.partial(1, 3);
plusab(5); // 9이렇게 일부 인자만 받은 새로운 함수를 만들고, 나중에 새로운 함수에 인자를 넣어 완성합니다.
여러 개의 인자를 받는 함수가 있을 때 일부의 인자를 고정한 함수를 만드는 기법입니다
커링은 수학자 하스켈 커리로 부터 유래된 이름이고 함수를 변형하는 과정을 말한다. 함수의 전달인자 몇 개를 미리 채움으로써 더 간단한 함수를 만드는 방법입니다. 커링도 partial application처럼 인자를 미리 고정할 수 있지만 하나씩만 고정한다는 것이 특징입니다. 또한, 모든 인자를 받을 때까지 계속 함수를 생성합니다. 매 번 인자를 1개씩 고정하는 연속적인 partial application으로 볼 수도 있습니다.
어떤 함수를 호출할 때 대부분의 매개 변수가 항상 비슷하다면 커링을 사용할 만한 후보라고 할 수 있다. 매개변수 일부를 적용하여 새로운 함수를 동적으로 생성하면 이 동적 생성된 함수는 반복적으로 사용되는 매개변수를 내부적으로 저장하여, 매번 인자를 전달하지 않아도 원본함수가 기대하는 기능을 채워 놓게 될 것이다.
    // 커링된 add()
    // 부분적인 인자의 목록을 받는다.
    function add(x, y) {
        if (typeof y === 'undefined') { // 부분적인 적용
            return function (y) {
                return x + y;
            }
        }
        // 전체 인자를 적용
        return x + y;
    }
    console.log(add(3, 5));

    console.log(add(10)(10));

    var add10 = add(10);
    console.log(add10(20));

    function multiplyThree(x) {
    return function(y) {
        return function(z) {
            return x * y * z;
            }
        };
    }
    multiplyThree(4)(8)(2); // 64
function multiplyThree(x) {
return function(y) {
return function(z) {
return x * y * z;
}
};
}
multiplyThree(4)(8)(2); // 64
Function.prototype.curry = function(one) {
var origFunc = this;
var target = origFunc.length;
var args = [];
function next(nextOne) {
args = args.concat(nextOne);
if (args.length === target) {
return origFunc.apply(null, args);
} else {
return function(nextOne) { return next(nextOne) };
}
}
return next(one);
}
function multiplyFour(w, x, y, z) {
return w * x * y * z;
}
multiplyFour.curry(2)(3)(4)(5); // 120https://www.zerocho.com/category/JavaScript/post/579236d08241b6f43951af18 https://webclub.tistory.com/m/6
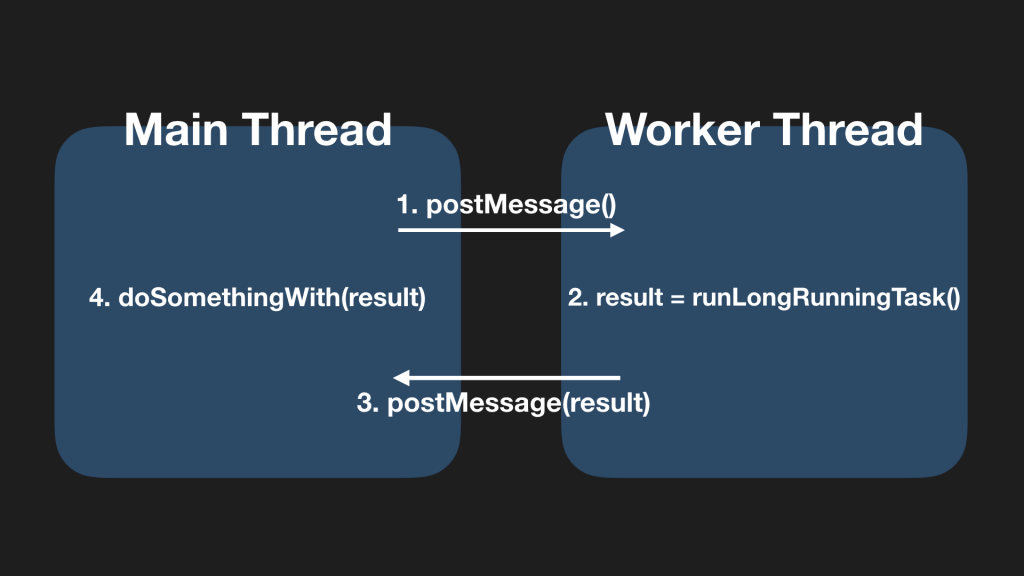
웹 워커 JavaScript에서 웹 워커(web worker)를 활용하면 멀티 스레딩이 가능합니다(참고). 웹 워커는 스크립트 수행을 메인 스레드가 아닌 별도 백그라운드 스레드에서 수행할 수 있게 해줍니다.
메인 스레드에서 워커 객체를 생성하면 워커 스레드와 메시지 기반으로 통신이 가능합니다. 워커 스레드에게 postMessage를 통해 처리하는 데 오래 걸리는 작업의 실행을 요청하면 워커 스레드는 이를 실행합니다. 이를 통해 메인 스레드가 블록되는 것을 막을 수 있습니다. 워커 스레드는 작업이 완료되면 역시 postmessage를 통해 결과 완료 메시지를 전송하고, 메인 스레드에선 이를 통해 또 다른 작업을 할 수 있게 됩니다.
https://engineering.linecorp.com/ko/blog/dont-block-the-event-loop/
// setTimeout은 시간이 지난후에 기능을 메시지(message queue)에 넣어줌(스택에 빌경우 실행)

setTimeout(() => console.log('setTimeout start'), 1000);
const helloT = setTimeout(console.log, 1000, 'setTimeout start');
clearTimeout(helloT);
// Interval이 1초보다 적다면 크롬에서는 1초로 강제로 변경
const helloT = setInterval(console.log, 5000, 'setTimeout start');

clearInterval(helloT);
// 이전에는 사물의 움직이거나할 경우 setInterval을 사용했지만, cpu/그래픽카드 같은 물리적인 장치가 느릴 경우 Internal이 느려지는 문제가 있었음
// 브라우저가 자체 프레임을 업데이트(repaint) 하기전에 호출이되서 처리되도록 하는 기능(cpu, 그래픽카드 최적화, 현재탭에서만 처리)
requestAnimationFrame(() => console.log('animation frame'));
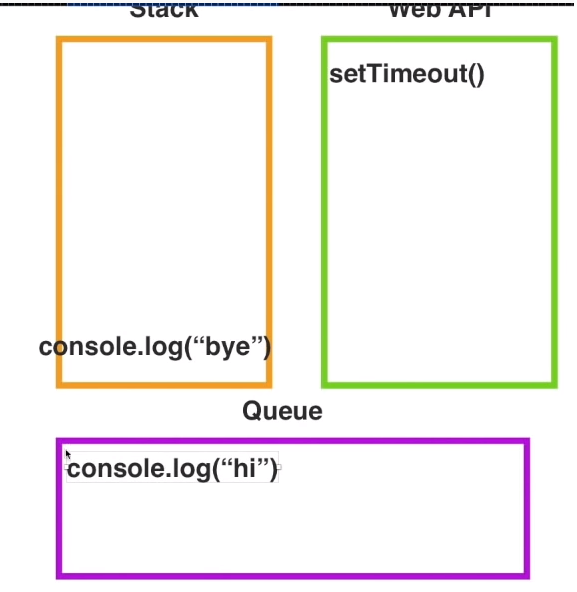
// 자바스크립트는 디폴트로 갖고 있는 않고 WebApi를 통해서 함수호출이 가능하다.
// stack -> webapi -> queue -> stack 비워질경우 queue에 데이터를 가져와서 stack에서 로딩 후 실행된다.
setTimeout(() => console.log("hi"), 0);
console.log("bye");
https://helloworldjavascript.net/pages/285-async.html
프로그레시브 웹앱(Progressive Web Apps)은 Google I/O 2016에서 소개된 미래의 웹기술이며, PWA라고 줄여서 부르기도 합니다.
먼저 구글에서 소개하는 PWA는 이러합니다.
PWA는 최고의 웹과 최고의 앱을 결합한 경험이다. 브라우저를 통해 처음 방문한 사용자에게 유용하며, 설치가 필요하지 않다. 사용자가 PWA와 관계를 점진적으로 형성할수록 성능이 더욱 강력해 질 것이다. 느린 네트워크에서도 빠르게 로드되고, 관련된 푸시 알림을 전송한다. 모바일 앱처럼 전체 화면으로 로드되고, 홈 화면에 아이콘이 있다.
네이티브 앱은 느린 네트워크에서도 작동하며, 백그라운드에서 푸시 알람을 보내줍니다. 또한, 카메라, 마이크 등에도 쉽게 접근하여 다양한 기능을 수행할 수 있습니다. 즉, Capability(능력)가 뛰어나다라고 할 수 있죠. 웹은 URL을 통한 접근이 간단하고, 설치 과정이 없습니다. 즉, Reach(범위)가 넓다라고 할 수 있습니다. 이는 다음 그림처럼 시각화 할 수 있습니다.
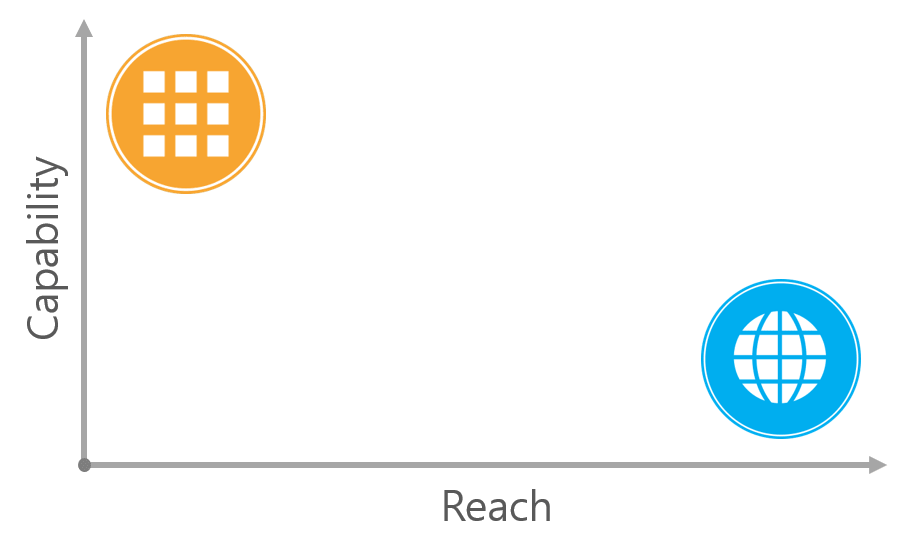
그리고 네이티브 앱과 웹의 장점을 결합한 PWA는 이쯤에 위치시킬 수 있겠네요.

  const btn = document.getElementById('btn');
  var myobj = {
    count: 3,
    setCounter: function() {
      console.log(this.count);
      btn.addEventListener('click', function() {
        console.log(this);
      });

      btn.addEventListener('click', (function() {
        console.log(this);
      }).bind(this)); // this를 강제로 변경가능

      btn.addEventListener('click', () => {
        console.log(this.counter);
      });
      // 화살표 함수는 this를 가지지 않고 현재는 선언된 위치상의 this를 가지므로 this가 myobj가 된다.
    }
  }

myobj.setCounter(); // this -> myobj function myFunc2() {
console.log(arguments) // arguments args,callee...
}
const myFunc2 = () => {
console.log(arguments); // arguments is not defined
}
function outer() { // arguments 회피방법(outer함수)
const myFunc2 = () => {
console.log(arguments); // outer의 arguments
}
myFunc2();
}
const myFunc2 = (...args) => { // arguments 회피방법(rest 문법사용)
console.log(args);
}
myFunc2(1, 2, 3);
  const tempFunc = function myFunc() {

  }

  const tempFunc = () => {

}call(), apply() 는 ECMA 3에서 추가 되었으며, bind()는 ECMA 5에서 추가 되었습니다. call(), apply()는 invoke입니다. 함수 호출을 즉시 합니다. bind()는 나중에 실행될때 사용 됩니다. 특정 이벤트를 함수를 호출해야 할때 유용합니다.
func.call(this, arg1, arg2, … argN); this 부분에 객체를 넣어주면 넣어준 객체를 가리키게 된다. 특이사항은 파라미터를 일일이 콤마로 구분해서 넣어줘야 하는 것.
// call
var obj = {name:"Niladri"};
var greeting = function(a,b,c){
    return "welcome "+this.name+" to "+a+" "+b+" in "+c;
};
console.log(greeting.call(obj,"Newtown","KOLKATA","WB"));func.apply(this, arguments); call()과 기능은 같지만 파라미터를 Array로 넘겨준다는 특징이 있다. 만약 함수에서 받은 모든 인자를 그대로 넘겨주는 경우, 가변 인자의 경우 유용하다. 또는 선택적으로 배열에 담아 전달할 수 있다.
// apply
var obj = {name:"Niladri"};
var greeting = function(a,b,c){
    return "welcome "+this.name+" to "+a+" "+b+" in "+c;
};

// array of arguments to the actual function
var args = ["Newtown","KOLKATA","WB"];
console.log("Output using .apply() below ")
console.log(greeting.apply(obj,args));bind()는 새로운 함수 인스턴스를 생성한다.
// bind
var obj = {name:"Niladri"};
var greeting = function(a,b,c){
    return "welcome "+this.name+" to "+a+" "+b+" in "+c;
};

//creates a bound function that has same body and parameters
var bound = greeting.bind(obj);
console.dir(bound); ///returns a function
console.log("Output using .bind() below ");
console.log(bound("Newtown","KOLKATA","WB")); //call the bound function// This is the same as the one below
sayHello()
function sayHello () {
console.log('Hello CSS-Tricks Reader!')
}
// This is the same as the code above
function sayHello () {
console.log('Hello CSS-Tricks Reader!')
}
sayHello()sayHello() // Error, sayHello is not defined
const sayHello = function () {
console.log(aFunction)
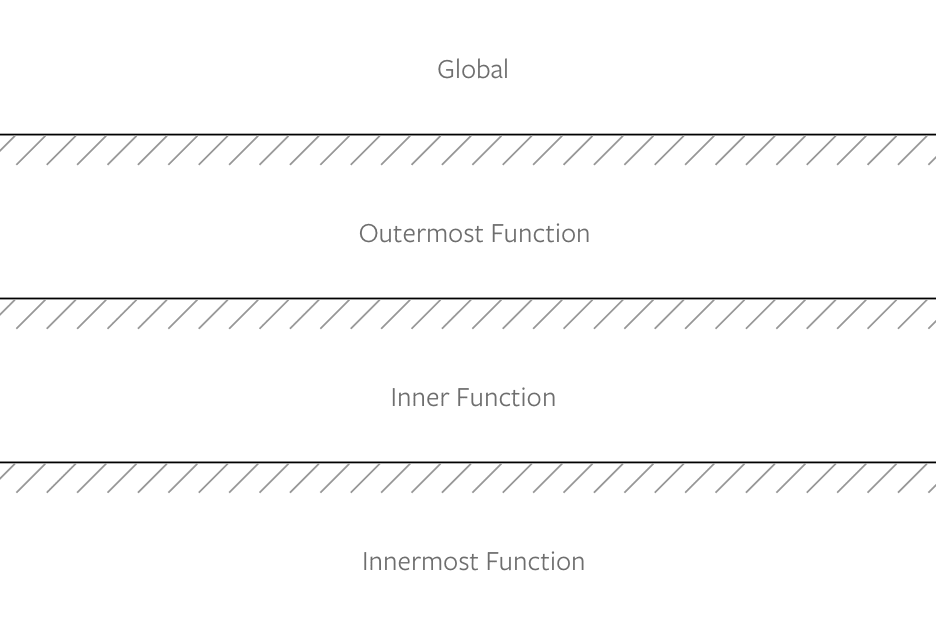
}자바스크립트에서 스코프란 어떤 변수들에 접근할 수 있는지를 정의합니다. 스코프엔 두 가지 종류가 있는데요, 전역 스코프(global scope)와 지역 스코프(local scope)가 있죠.
변수가 함수 바깥이나 중괄호({}) 바깥에 선언되었다면, 전역스코프에 정의됨
// 전역스코프 사용
const hello = 'Hello CSS-Tricks Reader!' // 전역변수
function sayHello () {
  console.log(hello)
}
console.log(hello) // 'Hello CSS-Tricks Reader!'
sayHello() // 'Hello CSS-Tricks Reader!'// Don’t do this!
var thing = 'something'
var thing = 'something else' // perhaps somewhere totally different in your code
console.log(thing) // ‘something else’
// Don’t do this!
let thing = 'something'
let thing = 'something else' // Error, thing has already been declaredfunction sayHello () {
var hello = 'Hello CSS-Tricks Reader!'
console.log(hello)
}
sayHello() // 'Hello CSS-Tricks Reader!'
console.log(hello) // Error, hello is not defined{
const hello = 'Hello CSS-Tricks Reader!'
console.log(hello) // 'Hello CSS-Tricks Reader!'
}
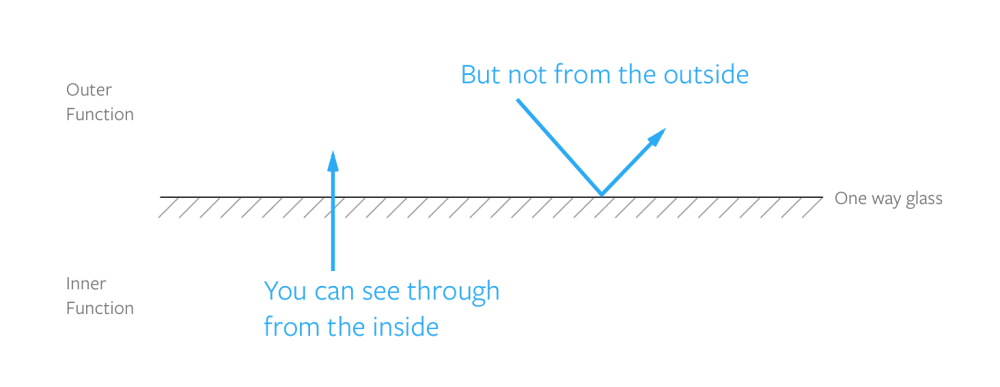
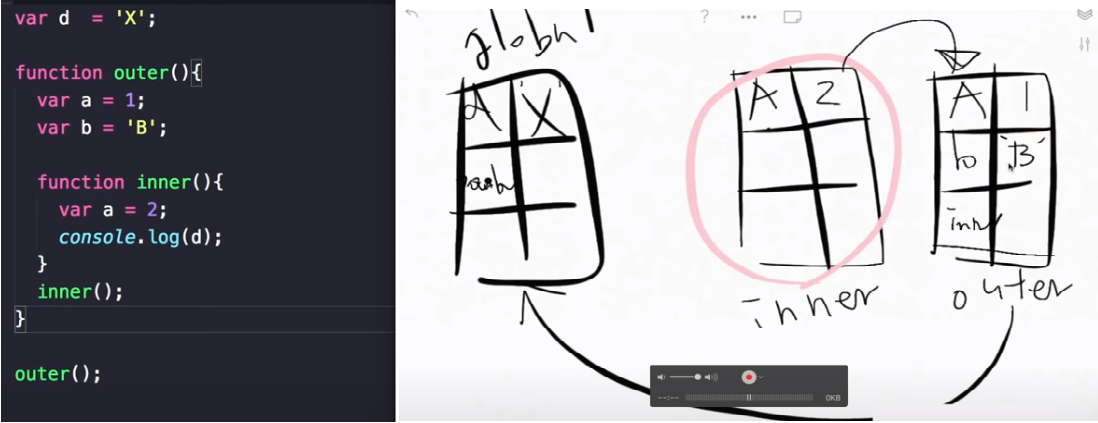
console.log(hello) // Error, hello is not defined자바스크립트에서는 함수가 선언될 때 자신이 접근할 수 있는 범위를 정하고 기억하고 있는데 이것을 렉시컬 스코프라고 합니다. 그리고 이런 렉시컬 스코프에 의해 외부 함수의 환경을 기억하고 있는 내부 함수가 클로저입니다.
하지만, 외부 함수는 내부 함수의 변수에 접근할 수 없습니다.
function outerFunction () {
  const outer = 'I’m the outer function!'

  function innerFunction() {
     const inner = 'I’m the inner function!'
     console.log(outer) // I’m the outer function!
  }

  console.log(inner) // Error, inner is not defined
}
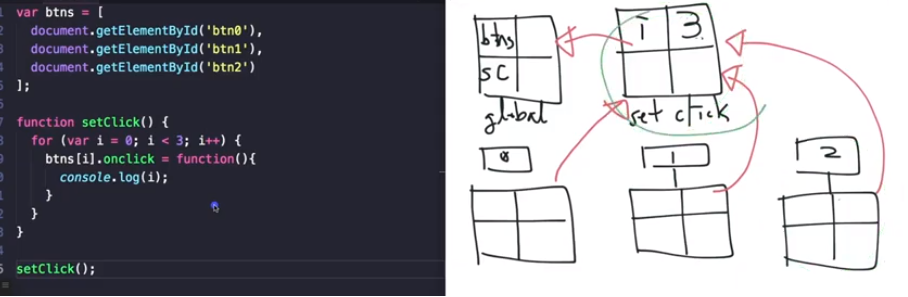
함수(setClick) 스코프만 존재할 경우
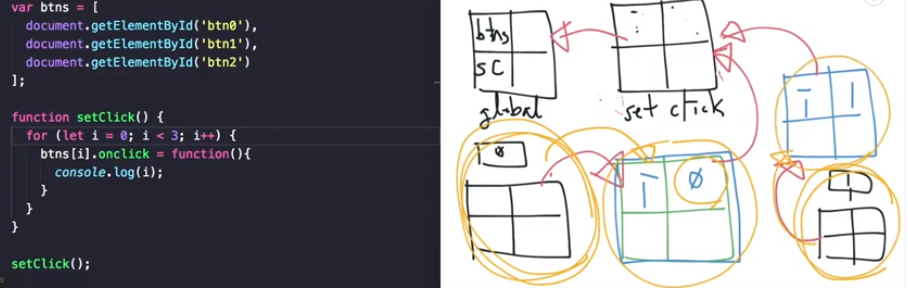
블록스코프(for문안에 {}) 스코프가 존재할 경우
클로저는 내부 함수가 정의될 때 외부 함수의 환경을 기억하고 있는 내부 함수를 말합니다. 외부 함수 안에서 선언된 내부 함수는 그 외부 함수의 지역 변수나 함수에 접근하여 사용할 수 있습니다.
function outerFunction () {
  const outer = 'I see the outer variable!'

  return function innerFunction() {
    console.log(outer)
  }
}
outerFunction()() // I see the outer variable!function secret (secretCode) {
return {
saySecretCode () {
console.log(secretCode)
}
}
}
const theSecret = secret('CSS Tricks is amazing')
theSecret.saySecretCode()
// 'CSS Tricks is amazing'https://d2.naver.com/helloworld/59361
Javascript에서 거의 모든 객체는 Object의 인스턴스이다. 일반적인 객체는 Object.prototype에서 속성과 메서드를 상속받으며, 그 일부는 숨겨질 수 있다. - MDN문서 정의
function Person() {};
var Person = new Function();
// javascript에서는 함수 또한 객체이다.

function Person(name, first, second) {
  this.name = name;
  this.first = first;
  this.seconde = second;
};
// 객체생성 시 person, person prototype 객체 2개가 생긴다.
// MDN 예시 코드
var Person = function() { // Person객체 생성
this.canTalk = true;
};
Person.prototype.greet = function() {
if (this.canTalk) {
console.log('Hi, I am ' + this.name);
}
};
var Employee = function(name, title) {
Person.call(this); // Person객체의 this를 지칭
this.name = name;
this.title = title;
};
Employee.prototype = Object.create(Person.prototype); // Person객체를 참조
Employee.prototype.constructor = Employee; // 자신을 지칭
Employee.prototype.greet = function() {
if (this.canTalk) {
console.log('Hi, I am ' + this.name + ', the ' + this.title);
}
};
var kim = new Employee('kim', 'student');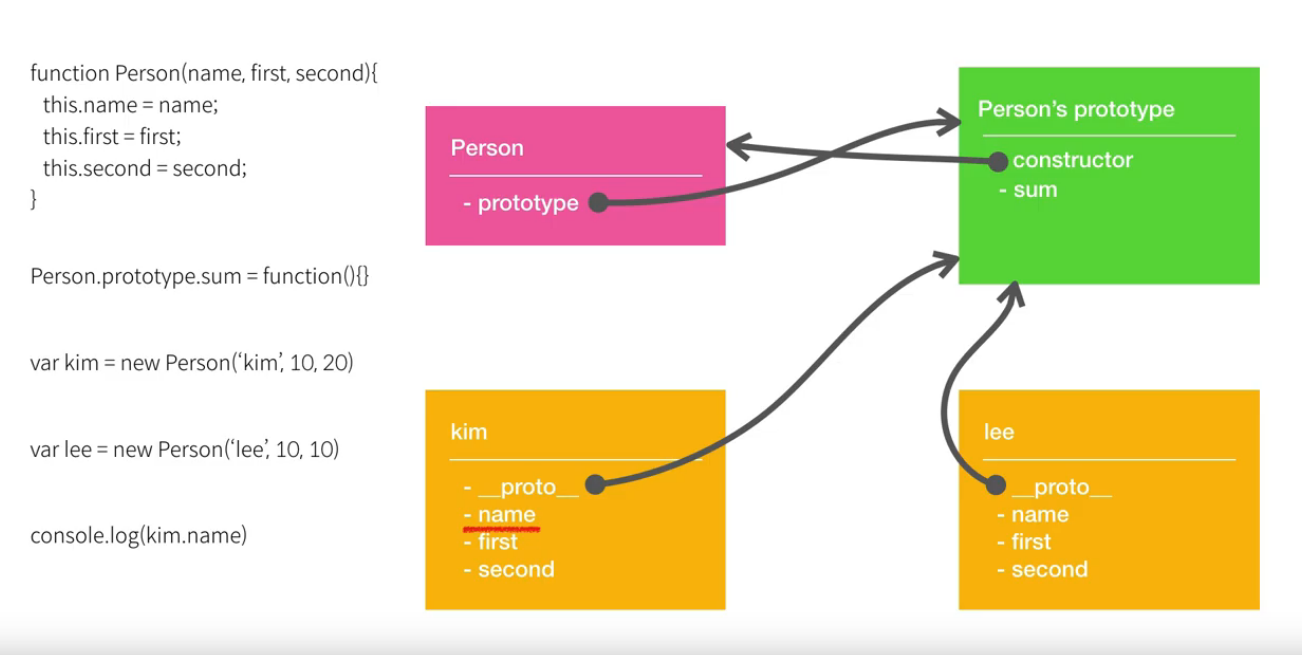 함수 객체 앞에 new키워드를 사용하면 생성자가 되고, 이것으로 생성한 객체를 인스턴스라고 한다. 위 이미지에서는 kim이 Person객체의 인스턴스이다.
모든 프로토타입 체인의 끝은 항상 Object.prototype이다. 그래서 Object.prototype은 __proto__속성이 없다.
1급 객체 (First Object, 또는 1급 시민)
고차 함수 (High-Order Function)
불변성 (Immutablility)
// 불변이 아닌 변하는(Mutatable) 데이터
function rateColor(color, rating) {
  color.rating = rating;
  return color;
}

console.log(rateColor(color_lawn, 5), rating) // 5
console.log(color_lawn.rating) // 5

// 불변성 데이터
function rateColor(color, ratring) {
  return Object.assign({}, color, {ratring:ratring});
}

console.log(rateColor(color_lawn, 5), rating) // 5
console.log(color_lawn.rating) // 0  *변하지 않음*
순수 함수 (Pure function)
var outadd = 2;

// 순수함수 아닌경우(외부요인에 따라서 값이 가변적이다.)
function add(first, second) {
    console.log(outadd + first + second);
}

// 순수함수인경우 (input 값에 따라서 output 값을 표현해준다. 외부요인이 없다.)
function pureadd(first, secode) {
    console.log(first, second);
}Originally published June 28, 2020
Latest update June 27, 2020
Related posts :